Introduction
This posting walks through the process of how to restore a list from an unattached content database in SharePoint 2010. The process of recovering just a list from the site content database backup involves four distinct steps and several different tools:
Step 1: Attach Content Database
This posting has shown how to restore a list from an unattached content database in SharePoint 2010, step-by-step. The process involves four distinct steps and several different tools: SQL Server Management Studio, SharePoint 2010 Central Administration, and PowerShell.
References
This posting walks through the process of how to restore a list from an unattached content database in SharePoint 2010. The process of recovering just a list from the site content database backup involves four distinct steps and several different tools:
- Restoring the content database backup to SQL Server, using SQL Server Management Studio,
- Provisioning the farm account in SQL Server to access the database, using SQL Server Management Studio,
- Exporting the list from the database to an export file, using SharePoint 2010 Central Administration, and then
- Importing the list to the desired SharePoint 2010 site, using PowerShell.
Step 1: Attach Content Database
- Place the content database backup in a convenient location. For this posting, the content database backups were placed in a folder off the root of the SQL Server host:

- Launch SQL Server Management Studio.
- In Object Explorer, right-click on Databases, and then select Restore. The Restore Databases dialog appears

- In the Results panel (at right), click Add. The Locate Database Files dialog appears.
- In Source for Restore, select From Device, and then click the ellipses button. The Specify Backup dialog appears.
- Click Add. The Locate a Backup File dialog appears. Expand the tree and then select the desired database backup:

- Click OK. The dialog closes, and the selected restore file appears in the list. Repeat this process for each backup to be restored.
- Click OK again. The Specify Backup dialog closes and the Restore Database dialog now displays the database to be recovered:

- Click OK. After a few moments, a prompt appears displaying a success message:

- This completed database recovery. Proceed to the next step to provision the farm administration account for this recovered database.


- Launch SQL Server Management Studio.
- In Object Explorer, expand the tree to display: [servername] > Security > Logins:.
- Double-click the farm administration account. For this posting, the account is Contoso\sp_farm. The Login Properties dialog appears, display the login properties for the farm account:

- On the Select a page panel at left, select User Mapping. The top Results pane at right updates to display a list of databases.
- Check the database that you attached (in this case Demo), and then click the ellipses button for that database. The Select Schema dialog appears:

- Click Browse. The Browse for Objects dialog appears:.
- Check the dbo item (database owner):

- Click OK. The dialog closes.
- Click OK again, the Select Schema dialog closes and the focus returns to the Login Properties dialog.
- In the bottom Results pane, check db_owner:

- Click OK. The Login Properties dialog closes.
- Close SQL Server Management Studio, and then proceed to the next step.


- Launch Central Administration.
- On the Quick Launch link section, click Backup and Restore. The Backup and Restore page is displayed. Look for the Granular Backup group:

- In the Granular Backup group, click Recover data from an unattached content database. The Unattached Content Database Data Recovery page is displayed:

- In the Database Name field, enter the name of the database involved with this recovery task. For this posting, the database name is Demo. Leave all other options default.
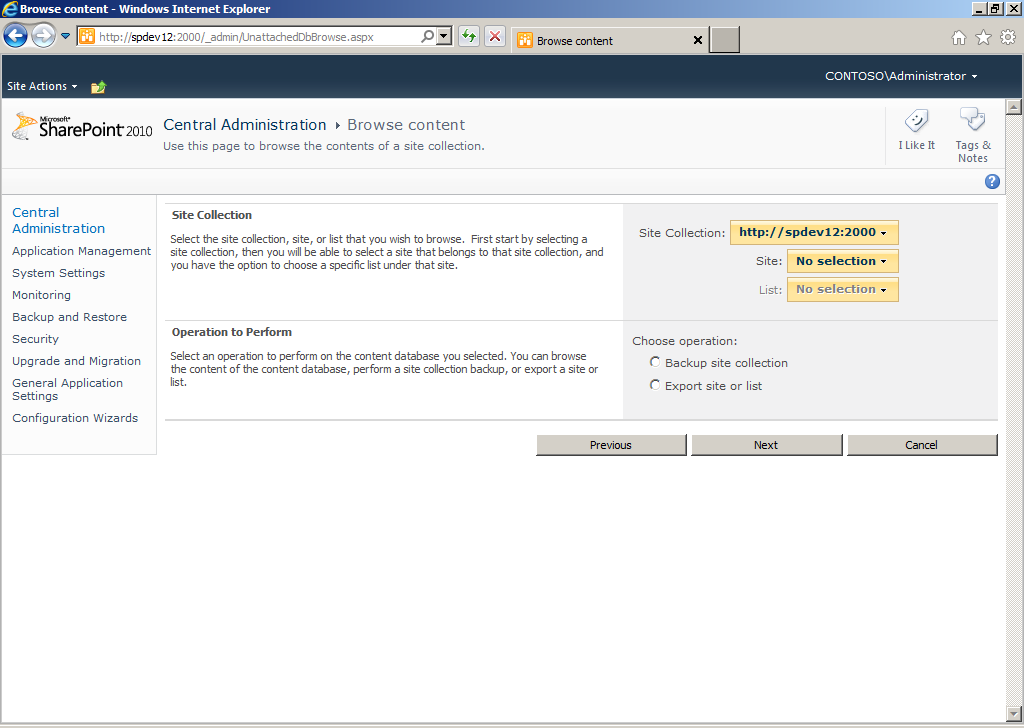
- Click Next. The Browse Content page is displayed:

- Click the Site dropdown (it currently states No selection). The Select Site popup page appears:

- In the URL column, click the desired site name. The results panel at right updates to displays associated with the selected item. For this posting, the selected site is Northwind.
- Click OK. The popup page closes, and the Site dropdown now displays Northwind:

- Click the List dropdown (it currently states No selection). The Select List popup page appears:

- On the Title column, click the name of the desired list. The results panel at right updates to display details associated with the selected list. For this posting, the Employees list was selected.
- Click OK. The popup closes, and the List dropdown now displays Employees:

- In the Choose Operation group, select Export site or list.
- Click Next. The Site Or List Export page is displayed:

- In the Filename field, enter the path and name for the intended export file.
- Check the Export full security and select the Export versions options as desired.
- Click Start Export. The Granular Backup Job Status page is displayed. This page repeatedly updates every few seconds or so:

- Wait until the Current Job Status states No operation in progress; then proceed to the next step.


- Go to the file location specified for the recovered list and verify that the list CMP file was in fact created:

- Open the SharePoint 2010 Management Shell.
- At the prompt, enter the following command, specifying variables as necessary: Import-SPWeb -Identity [URL to site you want to import to] -Path [path and name of recovered list file]. For this posting, the URL and path are as shown below:

- Once complete, return to the site and verify that the list has been recovered:


- This completes this procedure.


This posting has shown how to restore a list from an unattached content database in SharePoint 2010, step-by-step. The process involves four distinct steps and several different tools: SQL Server Management Studio, SharePoint 2010 Central Administration, and PowerShell.
References
- TechNet SharePoint 2010
- Import-SPWeb
- Backup and recovery for SharePoint Server 2010
- Recover content from an unattached content database (SharePoint Server 2010)
- Import a list or document library in SharePoint Server 2010
- Attach databases and upgrade to SharePoint Server 2010
- SharePoint Pro Magazine
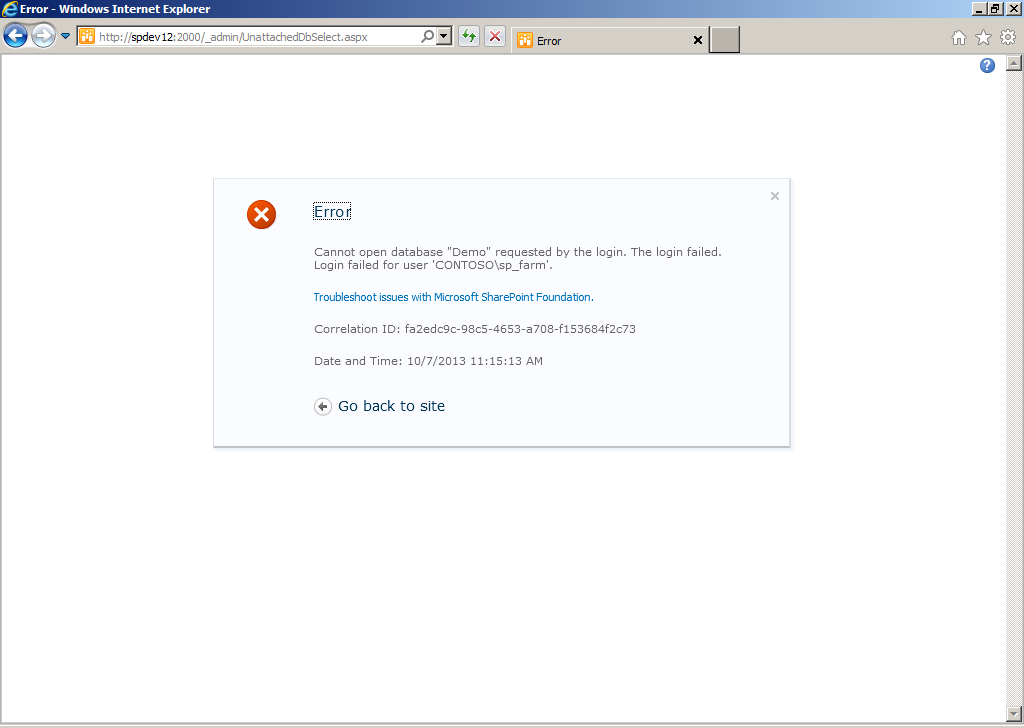
- Cannot open database [name of database] requested by the login. The login failed. Login failed for user [name of farm account]:This error indicates that the farm account has not been granted the db_owner role to the recovered database. Add this role and retry.

No comments:
Post a Comment