Introduction
This posting walks through the process of recovering a specific site from an unattached database backup, step-by-step. This procedure is performed on a SharePoint Server 2010 farm. The operating systems for all servers is Windows Server 2008 R2, and the farm data tier is hosted on SQL Server 2008 R2. This procedure employs the following tools: SQL Server Management Studio, SharePoint 2010 Central Administration and PowerShell 2.0.
Step 1: Restore the content database to the SQL Server instance
- Copy the content database backup file to the SQL Server host machine:

- Launch SQL Server Management Studio:

- Expand the console tree to display the Databases folder.
- Right-click on the Databases folder. A popup menu appears:

- Select Restore Database from this menu. The Restore Database dialog appears:

- In the Destination for restore section of this dialog, in the To database, field, enter a name that you want to give the restored database. For this procedure, Demo was entered.
- In the Source for restore section, select From device, and then click the ellipsis button. The Specify Backup dialog appears:

- Click the Add button. The Locate Backup File dialog appears:
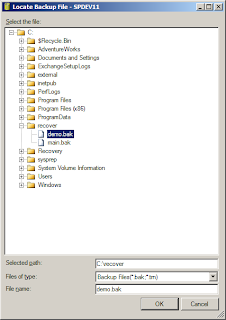
- Expand the tree to find the content database, and then select it.
- Click OK. The Locate Backup File dialog closes, the focus is returned to the Specify Backup dialog, the selected backup file now being listed:

- Click OK. The Specify Backup dialog closes, and the focus returns to the Restore Database dialog, with the database listed:

- Click OK. A progress indicator appears momentarily, and then the dialog closes. The newly restored database now appears in the Databases folder:

- This completes restoration of the content database.


Step 2: Export the site from the content database backup
- Launch Central Administration.
- In the Central Administration Quick Launch, click Backup and Restore. The browser is navigated to the Backup and Restore administration page:

- In the Granular Backup section, click Recover data from an unattached content database. The browser is navigated to the Unattached Content Database Data Recovery page:

- On this page, the Database Server name should already be entered. Enter the Database Name. This should be the same name that appeared in the Databases folder, after successfully completing the restore process.
- In the Operation to Perform section, select Browse Content, and then click Next. The browser is navigated to the Browse content page:

- In the Site Collection section, select the appropriate site collection and site from the dropdowns:.
- In the Operation to Perform section, select Export site or list:

- Click Next. The browser is navigated to the Site Or List Export page:

- In the File location section, enter the desired path and filename:.
- Click Start Backup. The browser will be navigated to the Granular Backup Job Status page:

- This page refreshes automatically after a few moments. Once the backup file has been successfully created, this status will be displayed in the Site Collection Backup section. This will create a file with ending CMP.
- Verify that the site backup was created:

- This completes export of the site from the content database backup.


Step 3: Create a new blank website
- Open a browser, and then navigate to the web application to which site backup will be restored.
- Navigate to the root site collection or subsite to which the site backup will be restored.
- From the Site Actions dropdown, select New Site. The Create popup dialog appears, filtered to display new site templates available:

- Select the Blank Site template. Then, in the configuration panel at right, enter a name for the new site and the name for the site that will become its URL:

- Click Create. A progress indicator appears momentarily, and then closes. The browser is then navigated to the new site:

- This completes creation of a new blank site.


Step 4: Import the site
- Logon to the machine hosting the farm Central Administration application.
- Launch the SharePoint 2010 Management Shell.
- Test the import by running the import using the WhatIf condition:
Import-SPWeb -Identity http://spdev12/jVectorMap -Path C:\jvectormap.cmp -Force -Verbose -WhatIf

- Run the import script using the Verbose condition. Doing so will display any minor warnings or errors generated during the import:
Import-SPWeb -Identity http://spdev12/jVectorMap -Path C:\jvectormap.cmp -Force -Verbose

- Otherwise, some errors may be missed:

- Checking the import log file revealed a minor error importing one of the files - a file that is prohibited from being uploaded by default policy:

- Open a browser, and then navigate to the new site. The contents of the new site should now appear:

- This completes this procedure.


Summary
This posting has presented a step-by-step walkthrough for how to restore a specific site from an unattached content database backup.
References
This posting has presented a step-by-step walkthrough for how to restore a specific site from an unattached content database backup.
References
- Import-SPWeb
- Import a list or document library in SharePoint Server 2010
- SharePoint 2010: Backup and Restore Best Practices
- "Unattached" in this instance means that the database is not attached to the farm. It has nothing to do with whether it is attached to the SQL Server instance.
No comments:
Post a Comment